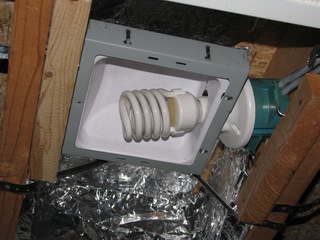
The original owners of this house lit the basement with 4 naked-bulb "fixtures" like you'd expect to find hanging down in an unfinished basement or a garage. Rather than hanging, the lights are mounted horizontally between the rafters. Aluminum foil is nailed to the sub-floor and surrounding timbers. Transparent prismatic sheeting replaces the drop-ceiling "tile" that would be below the bulb.
This doesn't work as well as I'd like. The light source is above the ceiling. Little of the light falls directly into the room, most hits the aluminum foil. The foil is old, badly crinkled, and mounted to flat surfaces -- so most of the reflected light doesn't even make it into the room. Quite a bit of it goes to illuminate the area above the ceiling.
Naturally, I've been trying to address this for some time. Tried reforming the foil. It's harder to shape multiple pieces of old, beat-up aluminum into a bowl shape than you might think. The best I was able to make resembled a tassel-less fez with a wire frame. Even then, I had trouble hanging it in such a way as to direct the light where I wanted. I looked at various clamp-on worklights, but the bowl-shaped ones all have the bulb entering through the center, not the edge. With the horizontally-mounted fixtures, these would direct even more of the light away from room. The metal reflector from a trouble-light would work. But I couldn't find just the reflector for sale, only new, complete lights. Those are too expensive to sacrifice for just the one part.
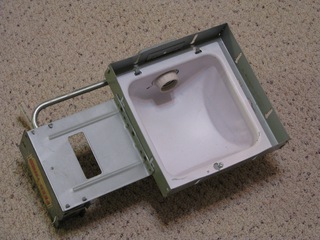
 Went to the Livingston County Habit for Humanity ReStore today, looking for a hot glue gun and a heat gun. (Great place to look for tools, if you're not too specific and willing to root-around in dusty, dirty boxes.) I picked up a couple of double-bulb fixtures, on my way to the tool section. Figured I could at least double the light if I couldn't direct what light I already had. Then I saw 2 of these.
I don't know what this is intended for, but it's more-or-less exactly what I needed. With the judicious application of wrench, screwdriver, tin snips, hammer & prybar, I removed everything from the large square. That left me with a square mounting-bracket containing a concave reflector with an opening in the side for the bulb.

This doesn't work as well as I'd like. The light source is above the ceiling. Little of the light falls directly into the room, most hits the aluminum foil. The foil is old, badly crinkled, and mounted to flat surfaces -- so most of the reflected light doesn't even make it into the room. Quite a bit of it goes to illuminate the area above the ceiling.
Naturally, I've been trying to address this for some time. Tried reforming the foil. It's harder to shape multiple pieces of old, beat-up aluminum into a bowl shape than you might think. The best I was able to make resembled a tassel-less fez with a wire frame. Even then, I had trouble hanging it in such a way as to direct the light where I wanted. I looked at various clamp-on worklights, but the bowl-shaped ones all have the bulb entering through the center, not the edge. With the horizontally-mounted fixtures, these would direct even more of the light away from room. The metal reflector from a trouble-light would work. But I couldn't find just the reflector for sale, only new, complete lights. Those are too expensive to sacrifice for just the one part.
 Went to the Livingston County Habit for Humanity ReStore today, looking for a hot glue gun and a heat gun. (Great place to look for tools, if you're not too specific and willing to root-around in dusty, dirty boxes.) I picked up a couple of double-bulb fixtures, on my way to the tool section. Figured I could at least double the light if I couldn't direct what light I already had. Then I saw 2 of these.
I don't know what this is intended for, but it's more-or-less exactly what I needed. With the judicious application of wrench, screwdriver, tin snips, hammer & prybar, I removed everything from the large square. That left me with a square mounting-bracket containing a concave reflector with an opening in the side for the bulb.

Took a little work to get it into the right position, and secured there. But the end result is very close to what I hoped to accomplish.
So, for $10, some left-over screws & nails, and the obligatory swearing when the drill doesn't fit*, I fixed 2 of the 4 lights. I didn't even have to rewire the fixture!
*Gimlets! One of these days, I'll remember to leave the drill and not have to go back for the gimlets. Pilot holes in tight spaces are much easier with them.

