January 2009 Archives

Shop-built bench-top router table

Router table (front).jpg
I need to profile (cut the edges) of some skinny boards.  I decided against balancing the router on top of said boards, cutting them freehand.  I like my fingers, and am confident I would shred them in such an attempt.

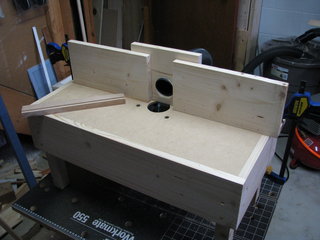
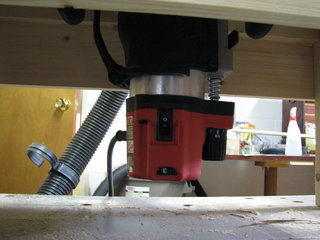
So I built this.  The legs are 2x2.  The carcass and fence are 1x8.  The surface is 1/4" MDF resting on 3/4" MDF.  The entire surface, save for a 6" hole for the router, is supported.  Best way I could think of to prevent sagging.  There is no joinery in this.  The frame pieces are simply glued-and-screwed to the legs.  The surface rests on interior shelf glued-and-pinned (5/4" brads) to the frame pieces.  The fence is glued-and-pinned.  Again, nothing even close to fancy.
Router table (rear).jpg

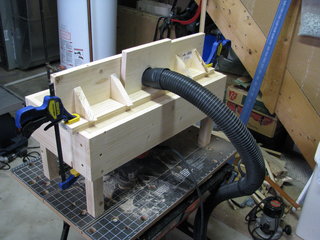
The fence has 2" hole, bored at an angle, to hold the 2" vacuum hose from my shop-vac/dust-collector.  I worry about breathing dust and, with the furnace & water heater in the same room, I'm mildly concerned by the possibility of a dust explosion.  As you can seen in this image, the fence isn't attached to the table.  I just clamp it on, wherever I need it to be.


Router table (underside).jpg


This is rough-and-ready work.  There are a few things about it that I'll change in the next version.  Chief among those, is that the bench isn't tall enough.  I made sure there was sufficient clearance to mount the router, but I failed to allow the space needed to remove it.  I must set it on it's side to change bits.  Not a big deal, really.

The Vortex Cannon of Science!

You may have seen the Zero Fog Gun at ThinkGeek.  If not, look at this image cheerfully swiped their Customer Action Shots:zero-blaster-alt2.jpg

Cool, especially with the dry-ice-stuff.  But kinda expensive.  More-so, when one considers the cats will quickly tire of ethereal rings roiling towards them, and Nicole even more quickly.

Recently, the Kitchen Science segment of the Naked Scientists podcast demonstrated a built-on-the-cheap vortex cannon. If you look at the website, you'll see that the Scientists' cannon is really just a 2l bottle.  Because I was listening to the podcast, and not looking at pictures, I got a different idea.  I thought they cut the bottom off the bottle, taped a membrane across the opening, and thumped it like a drum-head.  My immediate thought was, "I can make one of those."  Followed shortly by, "I can do better than that . . . "  I built this:
Vortex cannon.JPG
I used a jigsaw to cut a piece of high-density packing foam to fit the opening.  I drilled holes in the sides of the bottle and through the foam.  I ran a rubber-band through the holes.  Small wood blocks prevent the band from withdrawing into the bottle.  A small metal clip, much like a paperclip, provides something to grasp and pull at the base.  I tried to build a piston, rather than a drum-head.

According to the Scientists, I should be able to extinguish a candle at 1 meter.  Actually, they say 2-3 meters, with practice.  But hey, I'm impatient!  See for yourself:
Vortex Cannon.mov

I think I can improve it, though.  The foam piece is a little too tight.  I might try lubricating it.  I might also try my original idea of stretching a membrane across the opening.

Odds, Ends, & Birds

Blue Jay.JPG
Don't think I've posted a picture of a Blue Jay, yet.  If so, sorry -- yer gettin' another one!

On a completely spurious note, I'll be replacing the feeder arm shown here.  Because it curls-under, instead of up like a shepherd's crook, birds perch on the very end of it.  This places them immediately above the feeder.  Wherever birds perch, birds poop.  I checked 3 feeders with 3 different hangers.  This one was, by count of residuals, 3-4 times worse than the others.  Replacing the feeder arm will make it easier to clean the feeder hanging from it.

Hawk-wing snow-scrape.JPG
Not long ago, I looked up to see buff-colored movement in front of a window.  It was large, moving bird-fast, and approaching the feeder.  I watched.  A few moments later, a hawk retreated through the same space.  Clearly, he'd been hunting the feeder.  What caught my attention must have been him trying for a bird on the ground under the feeder.

I checked to see if he'd been successful.  He wasn't, but he left a neat impression in the snow.  The big dent is from feet.  The parallel curves are from his left wing.  I really like that individual feathers left traces in the snow.

The moire pattern in the image is from shooting through the window screen.  Sorry, not going outside in this weather, even for a cool picture.

New black mailbox & address.JPGNew mailbox.
As recorded previously, Nicole & I returned from our holiday trip to find the previous one upended.  More recently, it was struck by a plow (I found evidence of impact on the end of the wooden support -- not to mention the box being 20 feet from the post).  The new box is impact-resistant 20ga steel.  I shaved 4-5" from the horizontal support when I mounted it.  It shoudn't be struck again.  The swing-arm is canted in this picture.  I learned that the wash from the snowplow is sufficient to move the arm like this.  Something to remember for the future.  The arm being canted is not sufficient evidence to conclude the box was struck.

The new box did not come with an address kit.  At single-degree temperatures, no adhesive would stick.  So made something and screwed it into place.  The address label is actually printed-and-cutout, glued over window privacy film glued to a piece of 1x.  I wrapped the whole thing in clear plastic.  I think it turned out well, and should certainly help identify the drive at night.  It's shiny, Captain.
Song Sparrow.JPGGratuitous Song Sparrow.  Been watching this little guy trundle around under the feeders.  Looks like he's wearing one of those quilted down-filled coats from the 80's.

I Miss My Cat.

It's been 6 months.

Perhaps strangely, the thing that bothers me most is that none of the current cats will talk to me.
A couple days ago, I knocked against the corner of the hood over the range.  A screw fell out, and that corner of the hood dropped.  I shined a light into the gap and discovered that the screw was never actually sunk into anything.  It just skinned the inside of the carcass side on the underside of the cabinet.  I looked at the other corners, and discovered mismatched screws.  Never a good sign.  I put it on the list.

Range hood wiring.jpgToday, I decided to do something about.  First, the electrics.  On a hunch, I grabbed the camera.  Never again will I write little notes to myself about what connected where.  Nor bother with post-it note flags on the wiring.

After that, I removed the remaining screws.  All 3 practically fell out.  Despite that, the hood didn't really fall.  The hood was installed before the wall was tiled.  Three of the tiles were cut badly.  They gaped a quarter-inch below the others.  So the installer ran a bead of caulk to hide it.  The caulk not only covered the gap, it sealed the hood to the wall and the hood's filter to the wall as well.  Which, incidentally, means that the filter in the hood hadn't been changed or cleaned in 20 years.  That wasn't the only thing I found, though.
Drywall hole behind range hood.jpg
That's a 2-foot-long gouge in the drywall.  Apparently, the electrician ran the wire up to the left side.  The only cut-out in the hood is on the right side.  So the installer dragged a screwdriver or something through the drywall.  Nice.  If you look closely at this picture, you can see the caulk along the top and left edge of the tile, where it adhered to the range hood.  You can also see where the paper surface of the drywall tore-away with the hood.

If you look closely at the right rear corner of the underside of the cabinet, you'll see brown plastic.  It's a "staple block," I guess.  Like a glue block, but for staples.  Those caused a headache.  The basic problem is that the holes for the screws are inside the sides of the carcass.  The obvious solution is to attach scrap lengths of wood so there's something solid to mount the hood on.  The fun part was cutting shoulders on the ends of the scrap pieces to account for the "staple blocks."    After that, it was pretty straight-forward.  Oh, and that hole in the drywall?  Duct tape.  The only way to really fix it is to replace the drywall.  Neither Nicole nor I like the tile, so it's going to be replaced at some point.  That means the drywall will be replaced.  No point in patching something that's going to be demolished in the next few years, anyway.  It might be that someone else will be staring at that duct tape in 10 years wondering what the hell the previous owner was thinking.  But I hope not.

Return of The Shoe Ladder

First of all, now that the gifts have been given, a big Thank You to Grant & Amy for the subscription to The Family Handyman.  Clearly, it's turned-out to be handy, . . . man.  (OK. I so stole that from Grant.  But it bears repeating.)

Thumbnail image for shoe_tree_hung.JPGThose of you with long memories and eagle-eyes may notice that the stain doesn't match the surrounding wood, even though I was going to conduct experiments to match it.  I mentioned that to Nicole.  She reminded me that we're going to rip all of that out, anyway.  So I just used the same stain as in the upstairs hall.

In the foreground, you'll see my "persuaders."  I'm guessing that 2 coats of stain and 2 more of polyurethane thickened the dowels.  I applied the paste wax to the inside of the holes and gently applied the no-mar hammer.  Worked pretty well, I think.

shoe_tree_context.JPG


About this Archive

This page is an archive of entries from January 2009 listed from newest to oldest.

December 2008 is the previous archive.

February 2009 is the next archive.

Find recent content on the main index or look in the archives to find all content.