Recently in Tools Category

LED Replacement for Microscope Bulb

| 2 Comments
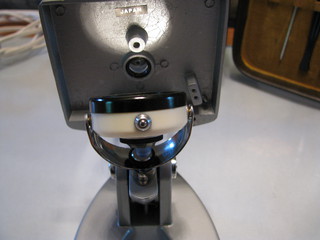
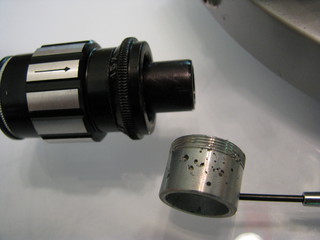
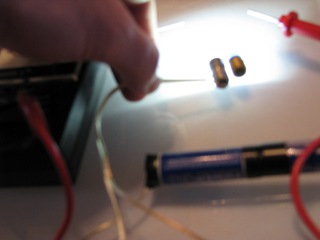
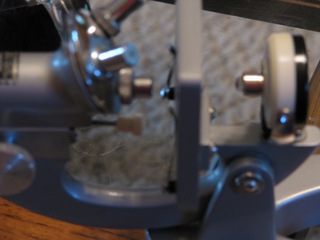
Received the LED replacement for the microscope's old, presumed tungsten, bulb.  It's the silver-color bulb in the left-center of this image:
microscope_test_rig.jpg
I wanted to test the bulb before I installed it.  No point in fitting it to the 'scope if the AA batteries won't power it.  I don't have a power-source.  So I scrounged some speaker-wire, taped the AA's together, and taped the speaker-wire onto the ends of the "battery pack."  The voltmeter confirmed I had 3V power at the end of my test leads.  Just for giggles, I applied the leads to the old blue bulb.  As I very much expected, the old bulb didn't light.  (Which is good -- now Nicole won't kill me for purchasing an unnecessary replacement LED.)
Lit_LED.jpg
When I touched the leads to the LED, it lit.  Huzzah!  I have a working bulb, that can be powered by the 2 AA batteries that fit into the microscope's base.
LED_dark.jpg


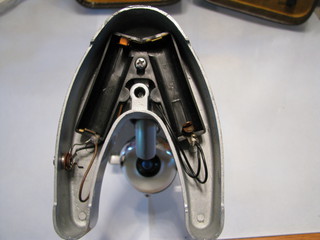
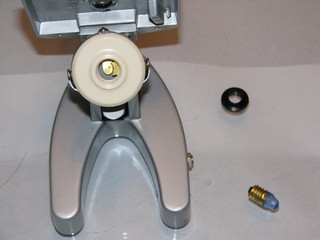
So why light?!?  That's the LED, installed in the microscope.  The batteries are in place.  I confirmed I have power at the bulb contacts, and at the bulb.  It's the same batteries, the same LED -- the only difference is the wires.  Instead of the test leads, power's through the wires in the microscope.  And those are working, because I have power at the contacts.

I just don't understand it.
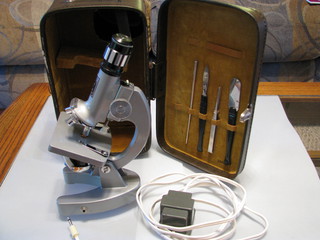
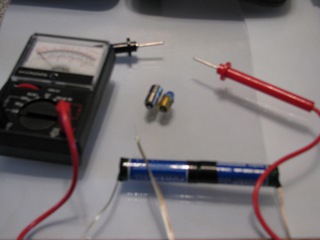
Microscope

New Tool/Project/Thing!
microscope_fullkit.JPG
While visiting Nicole, we went to the Goodwill Store (great place to get a printer, if you need one).  This was in the locked "really cool stuff" display, along with a bunch of games, a couple of RockBand/Guitar Hero controllers, a Wii Fit balance board, and a load of jewelry.  The mirror worked, I could see through it, the knobs turned easily, and it was $15.  How could I go wrong?  So Nicole indulged me.


microscope_front.jpg
As you can see (click), this is a JASON Model No. 712 Deluxe 900x Zoom.  Monocular (single eyepiece) with a 3-objective turret and both a reflector & bulb illuminator.  i.e., a basic student microscope from the 60s.  It's made of non-ferrous metal, not plastic, and chrome where anti-corrosion plating makes sense.

The kit is leather-over-wood, with flocking on the inside.  Some of the tools are missing.  The spatula, tweezers, scalpel, and some metal pipe-thingy are present.  There are no slides, prepared or otherwise.

The electrical socket (first picture, on the base, near the connector) appears to be in good working condition.  I was able to measure 3V AC at interior points.  I was disappointed to discover the transformer (the gray brick in the first picture) is only a step-down.  It drops the wall-current from 110V to 3V, but it doesn't convert it from AC to DC.
microscope_lamp.JPG
The illuminator is, in my ignorant opinion, pretty neat.  One surface is a mirror.  The other holds a blue-coated "classic" flashlight bulb.  The metal ball-bearing-looking thing on the side of the illuminator is a contact-switch.  When the bulb-side is uppermost, the ball's held against a small plate built into the base.  That completes the circuit and energizes the lamp.


microscope_base.JPGThis is meant to be a portable device.  In addition to wall-current, the lamp will run off of 2 AA batteries.  Space for the batteries is in the base.  I checked these, and the electrical connections appear to be functional here, as well.  Which is good, because here's where the complications begin . . .


Microscope_eyepiece.JPG
First, some previous owner (or maybe high school students, who knows) didn't understand how to tighten the screw holding the eyepiece to the barrel.  It's been over-tightened so many times, there are holes gouged into the fitting.  But, the holes are all in 1 quadrant.  So I just rotated it and gently tightened the screw.


Microscope_bulb.JPG
The bulb is burned-out.  Not surprising, given its probable age.  But I can't find an exact replacement.  Apparently, the bulb uses a tungsten filament.  These are no longer used because they consume a lot of energy, get very hot, and produce yellowish light (thus, the blue corrective film).  No one uses these anymore.  Student-grade microscopes use LEDs.  (Low-end pro-models use flourescent, and better models use remote halogen light sources with positionable fiber-optic tubes.)  I was hoping the transformer was also a rectifier.  Unlike bulbs, LEDs aren't able to run on either AC or DC.  Not a big deal, I just have to find a cheap LED that'll fit into the bulb socket, and then run it only on batteries.  (In fact, I found and ordered such a bulb.  It cost a few cents less than the microscope.)  Now I just need some slides.

Maybe Aidan & I can look at whatever's living in goopy pond water in a few weeks . . .

Crosscut Sled for My Tablesaw

Crosscut_sled_1.jpgBuilt a crosscut sled, years ago, for Dad's tablesaw.  A crosscut sled is a platform that rides on rails in the miter-slots.  Because it rides in both miter-slots, it's more stable than a miter gauge.  Because the rear fence is fixed at 90° to the blade and, unlike a miter gauge, it doesn't swivel, crosscuts are reliably at right-angles.  The fence provides a clamping surface for things like stop blocks, tenoning jigs, miter-blocks, etc.  And the fence means less splintering of cut wood.  The fence replaces the sacrificial piece of scrap.


Crosscut_Sled_2.jpg
The sled must be custom-built to each tablesaw.  So, when I built one for Dad, I was working in his shop with his tools.  Like his bandsaw and belt-sander.   That made cutting and shaping the fences pretty easy.  I don't have either of those tools.  So I laid-out the curves using a draftsman's French Curve.  I cut them with my $20 Black & Decker scratch-and-dent outlet-store jigsaw.  Then I eased the edges with a four-in-hand

The runners are UHMW plastic.  The platform is ½" birch plywood.  The fences are 1½"-thick red oak.  The platform is under-sized for the saw.  When I started work on the sled, I sized it for the saw I inherited from Nicole's Dad.  My current saw is larger.  I screwed the fences to the platform, without glue, so that I can use them with a larger platform, later.  At the moment, the largest Item I can cut is 8" across.  It's already proven useful, though.
Last year, we returned to a blizzard that left our (unplowed) driveway impassable.

This year, we returned to a tree (partially) across the driveway and scattered mail.

We have one of these:

mailbox.jpg
We bought it to replace the aged metal one left by the previous owners.  In the condition shown, it lasted less than 1 winter.  A plow hit it.  If you look closely, you'll notice 2 slots in the front of the post-cover, and a sliding-rail connection between the post-cover-and-newspaper segment and the mailbox proper.  The slots are for the screws that hold the cover to the post.  When struck by a plow, the torque is sufficient to (1) knock the segments apart (they're held together mostly by friction) and (2) wrench the lower segment around and off the post.

I purchased a Swing-Away Mailbox Bracket from Lee Valley.  The mailbox, proper, was undamaged.  I mounted it on the horizontal arm, and it was OK for a while.  (The swing bracket has been excellent.  Aside from the minor matter of it not returning to it's original location after being struck.  It's endured multiple plow hits.)

The second flaw in the mailbox became apparent only recently.  It's held closed, at each end, by a magnet.  Obviously, the magnets don't work on plastic.  There's a small steel plate screwed to the top of each opening.  The screw is small, not a bolt, and penetrates one layer of plastic.  Over time, the screw ceases to effectively hold the plate.  The plate rusts, interfering with the magnet's ability to hold.  Eventually the screw fails, or the magnet does.  The doors fall open.

The small-town Post Office here isn't  good at following directions.  Previously, we've left directions to hold our mail until we retrieved it.  Inevitably, despite our instructions, it would be delivered en masse on the first day of resumed postal service.  So, this time, we bowed to the inevitable and left instructions for the accumulated mail to be delivered.  Of course, we returned (at dusk!) to find the mailbox had been struck, the doors open, and (presumably) a week's worth of mail scattered in the 30 MPH wind.  We found some of it.  It's also possible that the Post Office kept the mail (because, of course, that would be exactly what we didn't instruct them to do).  What we found was very dry (for having lain on the newly-snow-free muddy lawn), so probably not on the ground long, and about what we'd expect for a single-day's delivery.
I'll be replacing the mailbox.  Soon.  Or maybe I'll just epoxy the magnets into place.

Did I mention the tree partially across the driveway?

New Camera

Nicole & I leave for Alaska, soon.

We've been unable to locate our camera.

A once-in-a-lifetime trip, without a camera, would be bad.

After we exhausted even the ridiculous, like calling Anne to learn if we'd left the camera at their house, and searching the basement, Nicole told me to go pick another camera (Happy Birthday to Me!).  I selected the Canon Powershot S5, largely on the strength of that review, and the fact that I'd like to (at some point in the future) try attaching my camera to a spotting scope (birders call this practice "digiscoping").  This camera is not an SLR.  But it's the next-best-thing, and Canon makes an adapter that allows it to accept additional lenses -- and also to be connected to an adapter for a spotting scope.
100_0246.JPG

Here are a couple of pictures I took with it:
Piper:
IMG_0007.JPG

Last rose in the front weed-bed:
IMG_0015.JPG

And, the picture of Spud I mentioned in my last post:
IMG_0010.JPG

Oh -- and the missing camera?  Well, I had to use something  to take that picture of the new camera, didn't I?  </sigh>

One Reel Lawnmower

I remember when Dad used a reel mower in Virginia.  I thought it was cool.  It whirred, it rolled, it made that cool snih-snih-snih-snih-snih sound.  Now, I have one.  I don't think of them as "cool" anymore.

I have learned things.  Mostly I've learned that what I had previously dismissed as "obsessive" lawn care stems from a past where gasoline-powered lawn mowers were expensive and rare. 

Take the hatred of moles.  It's not aesthetic distaste for yard-spanning, meandering tunnels disrupting the smooth expanse of lawn.  Those tunnels collapse into yard-spanning, meandering, impossible-to-see-in-uncut-grass soft spots exactly wide enough to trap a mower wheel.  The dirt excavated from those tunnels?  That goes into large blade-dulling mounds that stop the blades.  Those lovely trees that shade your lawn . . . drop sticks, twigs, even! -- that are more than sufficient to bind the mower.  Again, abrupt stop.  If you rake, thoroughly, before cutting, you'll only stop on a stick once per pass.  A group of tough, woody Dandelion stems is sufficient to bind the mower.  And, invariably, some of the stems grow close enough to the ground that the blades pass over them.  Leaving you with the certainty that they'll grow back before the next round of mowing.  Crabgrass, Quackgrass, whatever you call it?  That stuff that doesn't grow as a smooth carpet of green, but rather as large, above-ground-level clusters?  That stuff is dense, tough, and exactly the right height to stop the blades.  Again, hating it is not unreasonable from the perspective of a reel mower user.

And, the dog.  Your joyful canine companion.  Who hunted moles, while you cheered.  After all, moles are bad, right?  Collapsed mole tunnels are bad.  Dog holes are much worse.  In fact, the dog will convert her favored area from smooth lawn to an ankle-turning, not-a-level-square-foot-in-it nightmare of wheel-stoppage.  And she isn't afraid of the mower.  She'll stand in front of you, with that hurt expression in the big brown eyes, as you yell at her to move or get hamstrung.  Not to mention the inevitable -- finding a "deposit" when the blades convert it into a "weaponized aerosol."  (No, you won't find them all before you cut.)  You'll find yourself fondly remembering the stick-strewn area where you stopped only once per pass, rather than every 3-5 feet.

When you buy one of these, the description usually mentions that golf courses use reel mowers as finish-cutters on the greens.  This leaves you with the idea that you'll get a similar result.  Yeah, . . . no.  Reel mowers cut better than anything else when you're cutting homogeneous grass, on a perfectly flattened surface, with sharpened blades, and you never let the grass get tall enough to be a problem.  Towing the reel mower behind a small tractor doesn't hurt, either.  Oh, and you wont get a satisfactory cut with one pass over the lawn.  You'll have to cut it twice, perpendicular directions, to get something that looks like you cut it with something other than a scythe.  And you still must have trimmer, 'cause you ain't getting close to anything.  The blade-cage is a good 3 inches from the outside of the wheel.

Still, there's no smoke.  There's no $4-a-gallon gasoline to purchase.  It's 3-4 hours outside.  You can run it at 8 AM on Sunday and the neighbors don't even know.  Or 10 PM on Tuesday.  And the blisters heal by the next day.

More boring bench-slab babbling

I put away the Scrub.  It was time to pick up the Jack.
bench_slab.jpg
When I did, I learned a few things.
    I knew that using a single slab of wood for a bench-top was a bad idea.  All the books talk about wood movement (humidity & temperature induced expansion & contraction) being magnified by using a single slab.  But the slab was there, and only $35, and I thought "how difficult can it be?"  What I didn't know was how a slab anything is a knotty problem.  Look carefully at the picture.  There are 6 knots in the slab, in 2 groups.  The groups are roughly equidistant from the center.  If you look really carefully (open the image) you'll see tear-out around the knots.  The knot, itself, is endgrain.  The wood around it is surfacegrain, but changes direction around the knots.  Planing with the grain is not easy, when the direction of the grain changes within the length of the plane.  Oh -- and the center of one knot is dessicated.  So, rather than shearing cleanly when I plane it, it comes out in dry chunks.  Leaving a good-sized hole in the surface.
    At the far end of the slab (as seen in the image) is a very nice area of burl wood.  It's really pretty.  It's gorgeous, rippling, wavy, . . . I swear I can see flecks in it, like in Oak.  And different colors.  But it's all too easy to tear, because burl doesn't so much have grain as an EKG reading.
    And I haven't mentioned the insect holes or the dessicated split near the burl, or the not-quite-burl at the near end, . . .
    If you look at the near end, you'll see what's left of the gouges left by the Scrub.  I don't know, I may have gone too deep, there.  Did I mention that this thing is 52 inches long?  I can't work the length in a single pass, it's too long for my arms.  That means I must worry about creating 2 or 3 flat regions that are different thicknesses.

I haven't had this much fun since I taught myself VBA!  I have no idea what I'm doing.  I don't think I'm ruining anything.  (I can't really -- pine is way too soft to use as a bench; this bench-top's life expectancy is a few years, at best.)  Every time I lay down my tools, I can see it's flatter.  I see the shavings curl out of the plane, hear the wood being sliced and the plane's sole slide, smell the fresh cut-wood scent, feel the almost-crisp flattened surface and the fatigue in my arms and chest . . .  and think about how I can do this, am doing this.  Me -- the guy who would have flunked woodshop if they'd let me.
scrub.JPG

"Hog" is another name for a scrub plane, because it hogs off a lot of wood quickly.  A scrub plane is for thicknessing boards, or for flattening really unflat boards.  Like, for example, this slab of pine, which is fairly seriously cupped.  After I've flattened it, it'll become the top of my first bench.
If you look closely, you'll see that the cutting edge of the plane's blade is curved.  This allows it to take a deep, though relatively narrow, cut.  You've also probably noticed that the plane is wooden.  I have no other wooden planes.  I tend to mistrust them, as I doubt the old ones are flat & square and if I'm to purchase one, I prefer metal.  But I found this one at an antique dealer with whom I've had good experiences.  The price was reasonable, the piece in solid shape, and a scrub doesn't need to be flat & square, anyway.  Strangely, I think the blade is from a metal-body plane.  It has a cap iron, which I've never seen pictured on a wooden plane.  The cutter's marked "Auburn," which I've seen in books, but never in person.

I ordered a hammer to use in adjusting it.  You need a brass/wood hammer for that.  Wood to tap the plane body & wooden cap, brass to tap the steel blade (steel on steel would mushroom the blade).  That'll be here soon.  I doubt I'll get to use the plane again, before it arrives.  I did (gently!) use a tack hammer to adjust it today.  Maybe I shouldn't have, but I really wanted to see what it could do.

Oh -- and I got a standard-angle block plane, at the same time.  That's in the background, next to the Delta sharpening machinery.  It's missing a non-critical part, but it was less than $20 and in good working order.  I used it to good effect on the compost bin.

Grandpop's Fillister Plane

Fillister.jpg

So, probably the first question on your mind is, "What the heck is a fillister, anyway?"  Hah!  an opportunity for pedantic over-exposition, sez I.

Most people recognize 2 kinds of planes, both meant for flattening (or reducing the thickness of) wood surfaces.  There are block planes -- generally small, handle-less, and meant for use on endgrain.  There are bench planes -- larger, with a handle and a knob, and meant for use on facegrain and edgegrain.  Less well-known are rabbet planes.  These look like small bench planes, except the blade extends across the entire sole of the plane.  If you cut a "slot" into a wood surface that is across the grain, it's a "dado."  If the slot's with the grain, it's a "groove."  If the groove is on the edge of the surface, it's a "rabbet."  Clear?  (yeah, I know, I don't really get it either -- my copy of Garrett Hack's The Handplane Book is next to me as I write this.)  A rabbet plane cuts -- you guessed it! -- a rabbet.

Further complicating things, some rabbet planes are equipped with a depth stop, a fence, and a nicker (a very small blade, set at the edge of the plane, that lightly scores the wood ahead of the blade; it reduces tear-out and effort).  These are called Fillister planes (finally! took long enough to answer that question).  The particular plane shown above is a Duplex Fillister.  I assume "duplex" because of the second, forward, blade position.  If the plane had only the forward position, it would be a Bullnose rabbet plane (yet another sub-specialized tool).  A bullnose rabbet is for cutting a stopped rabbet.  The blade is really close to the front of the tool.  Basically, you figure out where you want the rabbet to stop.  Then you cut at that point, chisel-out enough space for the bullnose's front, and use the plane to cut the rabbet to that space.  If I move the blade from the rearward position to the forward position, this plane becomes a bullnose rabbet.

So why is it here?  Well, the fence is working.  It was missing the rod that supports the fence.  I "replaced" it a few months ago.  I went to Lowe's/Home Depot, found a long bolt with threads that fit, and cut off the bolt's head.  But I wasn't happy with that solution.  Last week, I discovered that Stanley sells parts via their website.  I have a Stanley block plane that needed an eccentric plate (this entry is long enough -- it's the thing that controls the width of the throat).  So I ordered one.  And I noticed that they also sell fence-kits for a #78 Stanley Duplex Fillister.  Grandpop's plane is a Craftsman, made by Stanley, and is basically a #78.  I thought I might get lucky, so I ordered it, too.  I didn't get lucky with the fence-kit.  But it caused me to fiddle with the cut-off bolt.  Enough that the plane works, now.  (The eccentric plate fit perfectly.  I now have a completely functional low-angle block plane.)

One other point -- a Black & Decker Workmate is completely, totally, absolutely, and without question unsuited for handplane work.  It is way, way, way too light.  You can't tell in the image, but the rabbet gets shallow toward the "top" end.  This is because I couldn't stand over the workpiece, putting my weight on the plane.  I had to stand with one foot on the Workmate, keeping it from rocking off the floor & shifting when the blade touched wood.  Amazingly frustrating.  I need to build a bench.

About this Archive

This page is an archive of recent entries in the Tools category.

Thoughts is the previous category.

Find recent content on the main index or look in the archives to find all content.