
I finished Anne & Daniel's compost bin.

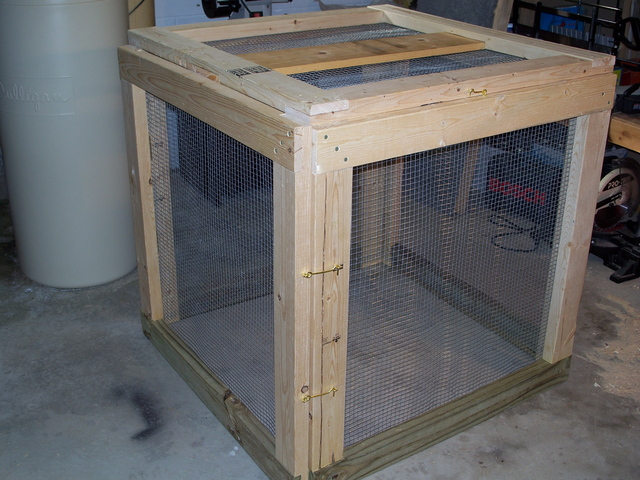
On the whole, I'm happy with this. If I make another one, I'll try just using eye-hooks on all 4 corners, rather than gate hinges on 2. The hinges allow the bin to fold for storage, which is good, but they also force it out of square. That makes the lid fit worse than I wanted. Other things that I learned:
OK. Time to get cleaned-up and go make a delivery, eh?
On the whole, I'm happy with this. If I make another one, I'll try just using eye-hooks on all 4 corners, rather than gate hinges on 2. The hinges allow the bin to fold for storage, which is good, but they also force it out of square. That makes the lid fit worse than I wanted. Other things that I learned:
I made the lid almost entirely with hand tools. It's not actually that much slower, if at all. For one thing, cleanup is actually possible. Router & tablesaw throw so much fine dust into the air that it's impossible to vacuum it all, even with the vacuum connected to the tool. Coats everything in the room. Including me, from head to knee. Tablesaw requires at least a side-support. Router needs a guide clamped to the work. Handsaw and chisel require . . . well, I did have to sharpen a chisel at one point. And cleanup was easy. I may not do it again, though. When I started, I thought it'd be good practice. And it was. But construction-grade lumber is knotty, twisted, and meant for power tools. Even a smallish knot is no fun to chisel or plane. There's a reason old-timers spent a lot of time selecting wood. It payed off.
- Lap-jointing the bottom corners was a bad idea. It results in endgrain of the vertical pieces being in contact with the ground. That will draw water into the wood, and cause it to rot faster than it would, otherwise.
- Pressure-treated lumber, even the newer less-toxic stuff, is probably not something to use on a compost bin. "Pressure-treated" is marketingese for "we stuck this wood into a vat of liquid heavy-metal poison, then increased the pressure so that the liquid would be forced into the wood." The toxins will leach from this stuff, into the ground. Which means it'll leach into the compost. Anne & Daniel know about this, so the compost from this bin won't be used on food-plants. And I'll spray the bottom rails with tree-sealant.
- I planned to put black plastic sheeting (like a trash bag) across the bottom of the lid. That would trap some/most of the heat of the composting material, and make it compost faster. But, in working on the lid, I decided the wire would just shred the plastic. And, the lid is mostly intended to keep critters out. (Daniel & Anne's place is on the edge of "wild" urban land.) So I abandoned the plastic. Of course, as I sit here, I realize what to do. Tape the plastic to 3sqft piece of cardboard, and staple it to the underside of the lid. The cardboard will protect the plastic. Naturally, Nicole & I made a recycling run yesterday, emptying our supply of corrugated cardboard. Maybe Anne & Daniel have some. Oh well.
OK. Time to get cleaned-up and go make a delivery, eh?

Well, I don't know nothin' about no problems of evil or hogs or religion or the like, but you finally made me create an account because - having attempted a similar feat with nothing more than wooden pallets, a few nails, and copious swearing (OK, and also a hammer) - I can say with some authority that that is a rockin' awesome compost bin. Have no regrets about not plasticking the top; apart from marring the aesthetic loveliness of your creation, it would have stopped the rain from watering the compost.
Cheers!
Hi, Kel! Is good to be reading your words.
1) Thank you for the compliment. As much as I generally fail to notice anything other than the imperfections, I have to admit it seems I did a good job with it.
2) I intended the plastic to keep out rain & snow, thus trapping the heat and speeding the composting process. From what I've read, a moisture-proof lid will reduce the composting time to a year-or-so. Still not as fast an enclosed plastic bin, but faster than a wire bin with an open-top. But it'll certainly work without the lid. And I suspect you know more than a bit more about compost than I. If you say it's better to not have a lid, I cheerfully assume it worked-out for the best!
3) I salute you for building anything from pallets. I did briefly consider a pallet-based design for the first bin I constructed. But I didn't have a source for pallets, and I know they're gnarly, splintered, and difficult to take apart. On the other hand, I've read that back when people just threw them out after 1 use, they were an amazingly good source of cheap hardwood for woodworkers. Had to run a magnet over them and disassemble them carefully to avoid damage, but otherwise they were no worse than any other rough-hewn stock. And free-for-the-taking is a tough price to beat!